HOW TO RECORD SCREEN IN WINDOWS 10 WITHOUT ANY SOFTWARE.

Record Your Windows 10 Desktop Screen Without Any Software, Here’s How
Screen recording can be really handy to make a video about some problem you are facing on your computer, or to capture anyone’s activity on a computer, or to make a tutorial, or record a game walkthrough, or prepare for a presentation, etc. Basically, users mostly use third party tools in Windows PCs including Windows 10 version. However, there is an inbuilt utility tool that allows you to record screen in Windows 10. All you need to do is activate some settings on your PC and you can easily record screen.Given below are the steps that you can follow to record screen in Windows 10 without any software. All you need to use is some shortcut keys of your keyboard and Windows 10 will display you the game recording options that you will be using to record screen.
Step 1: Firstly, click on start in your Windows 10 and then type “Xbox app”. Once done, just open the Xbox app.

Step 2: Once you are in the Xbox app, press combination of keys on your keyboard that is “win+G.” You can do this on the screen you want to record. The moment you press this combination, a popup will appear asking you for that is it a game? Just click on Yes, it is a game.

Step 3: You will notice few options that are “Screenshot”, “Start Recording” and “Settings”.
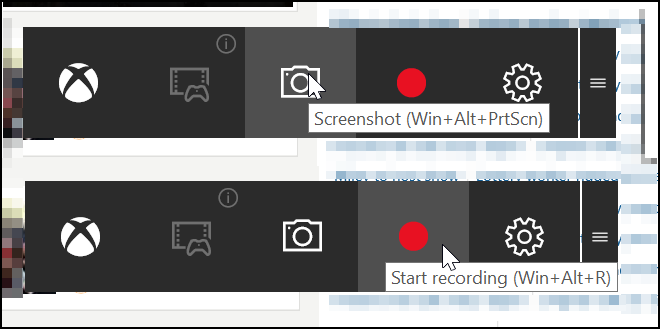
Step 4: Choose the Start recording button and the recording will get started. Once done, stop the recording.
It’s done! With this cool trick, you can now easily record screen without using any third party tool. You can also select out screenshot feature in this game bar tool.
Recording your Screen Using VLC Media Player
VLC is a great media player that can play almost any media format. VLC media player does not require any codecs and can actually decode the videos faster than other media players that do require codecs to be installed in your system. With the help of VLC Media player, you can record screen without any external third-party recording software. This method can be used in Windows 7, 8 and 10.Steps to record screen using VLC media player:
Step 1: Firstly, download and install VLC Media Player on your Windows computer, if you don’t have one.

Step 2: Now, launch VLC media player and click on “Media” and then choose “Open Capture Device.”

Step 3: You need to click on the drop down under Capture mode, and then select desktop.

Step 4: Set all other options according to your wish and then click on “Play” button.

Step 5: Then, click on “Stop” button.

Step 6: Now you will see the screen like below. Here you need to right click on your recording and select the option “Save” and save it to your desired location.

That’s it! You are done. This VLC media player method works with every Windows version and you do not require any additional software to record your desktop screen.
HOW TO RECORD SCREEN IN WINDOWS 10 WITHOUT ANY SOFTWARE.
 Reviewed by Abdurazak Ngowo
on
March 12, 2017
Rating:
Reviewed by Abdurazak Ngowo
on
March 12, 2017
Rating:
Reviewed by Abdurazak Ngowo
on
March 12, 2017
Rating:


No comments: